

Slido is gradually rolling out a new user interface. If the below steps and visuals match what you are seeing, then you are using the new interface and this article is for you. If not, please see this version
When needed, you can secure your event by adjusting its privacy settings. Although the options will vary depending on your plan, even Basic Slido events can be hidden from search and protected by a passcode.
The availability of these settings varies by plan. Please check the respective part of the article to see which setting is available with what license. Our free Basic plan does not offer any of the mentioned options.
In this article:
Access your Privacy settings
To change the Privacy settings of your event, follow these simple steps:
- Open up your Settings
- Select the Privacy tab on the left side
- Toggle on Require authentication to see all options (require name, email, passcode, single sign-on, etc.)
It’s under Require authentication where you can set your event to require name, email, passcode, or even Google or SAML single sign-on (SSO).

Notice that this is also where you can designate your Participant privacy settings. This determines if participants will respond with their names or anonymously. See our guide to learn more.
Hide your event from search
Available in all plans.
Enabling this option hides your Slido and event code from search suggestions. Only those who enter the exact code will be able to access your Slido during its event dates.
Pro tip: Use a very specific event code – something that’s easily recognizable for your attendees, but difficult for anyone to mistake as a different event.
Secure your event with a passcode
Available in all plans.
When enabled, only the participants who enter the correct passcode will be able to join your Slido event. Use a passcode that's easy to remember, but includes both letters and numbers to make it harder to guess.
Along with a passcode, you can also require a name or email address. Keep in mind, however, that participants can enter any name or email address.
Restrict access to your event
Available in our Professional plan and higher.
This option allows only participants with a certain email to access your event. You can either add a list of email addresses (max 1,500) or restrict access to specific email domains.
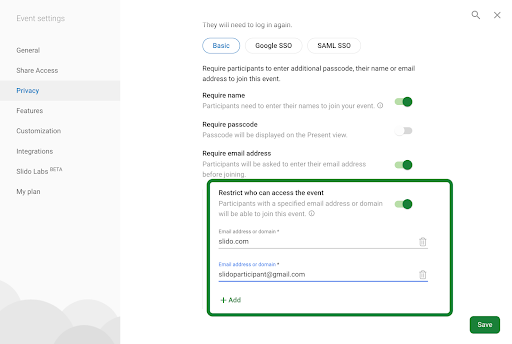
When joining the event, the participants will be required to enter their email. If their address or domain matches your list, they’ll receive a 4-digit access code in their inbox. If their email does not match, the system won't let them in.
Please note that if a participant joins for a second time on an alternate or incognito browser, they’ll need to re-verify their email address with another access code.
You can also require an email address without restricting the access. This will help you collect email addresses from participants, but won’t protect the event from unauthorized access.
Set up SSO for participants
Available in our Enterprise, Premium and Institution plans.
To protect your data, you can configure your privacy settings to require single-sign-on (SSO) authentication. With this enabled, only the people from your SSO list will be able to join your Slido event. Please see our comprehensive SSO guide for setting this up.
Pro tip: Test out your privacy settings. You can test the participant experience of joining your event by clicking the view as participant option in the bottom right corner. Or you can always copy and paste the Slido link into an incognito or alternate browser
Curious about more?
") We do have a
We do have a