Integrate Slido with Google Slides and start adding polls, quizzes, and Q&A directly to your presentation. You'll be able to display the results and audience questions on your slides in real time.
If you’re a Google Workspace Administrator looking to install the Slido add-on for your entire organization, check out our specific guide for that.
In this article:
Install our add-on and add Slido to your presentation
Please note: Add-ons for Google Slides are tied to specific Google accounts. For Slido polls to work, you need to be presenting from a Google account that has the Slido add-on installed.
See the steps below for adding and opening the Slido add-on. This will make the add-on available across all browsers and devices you use.
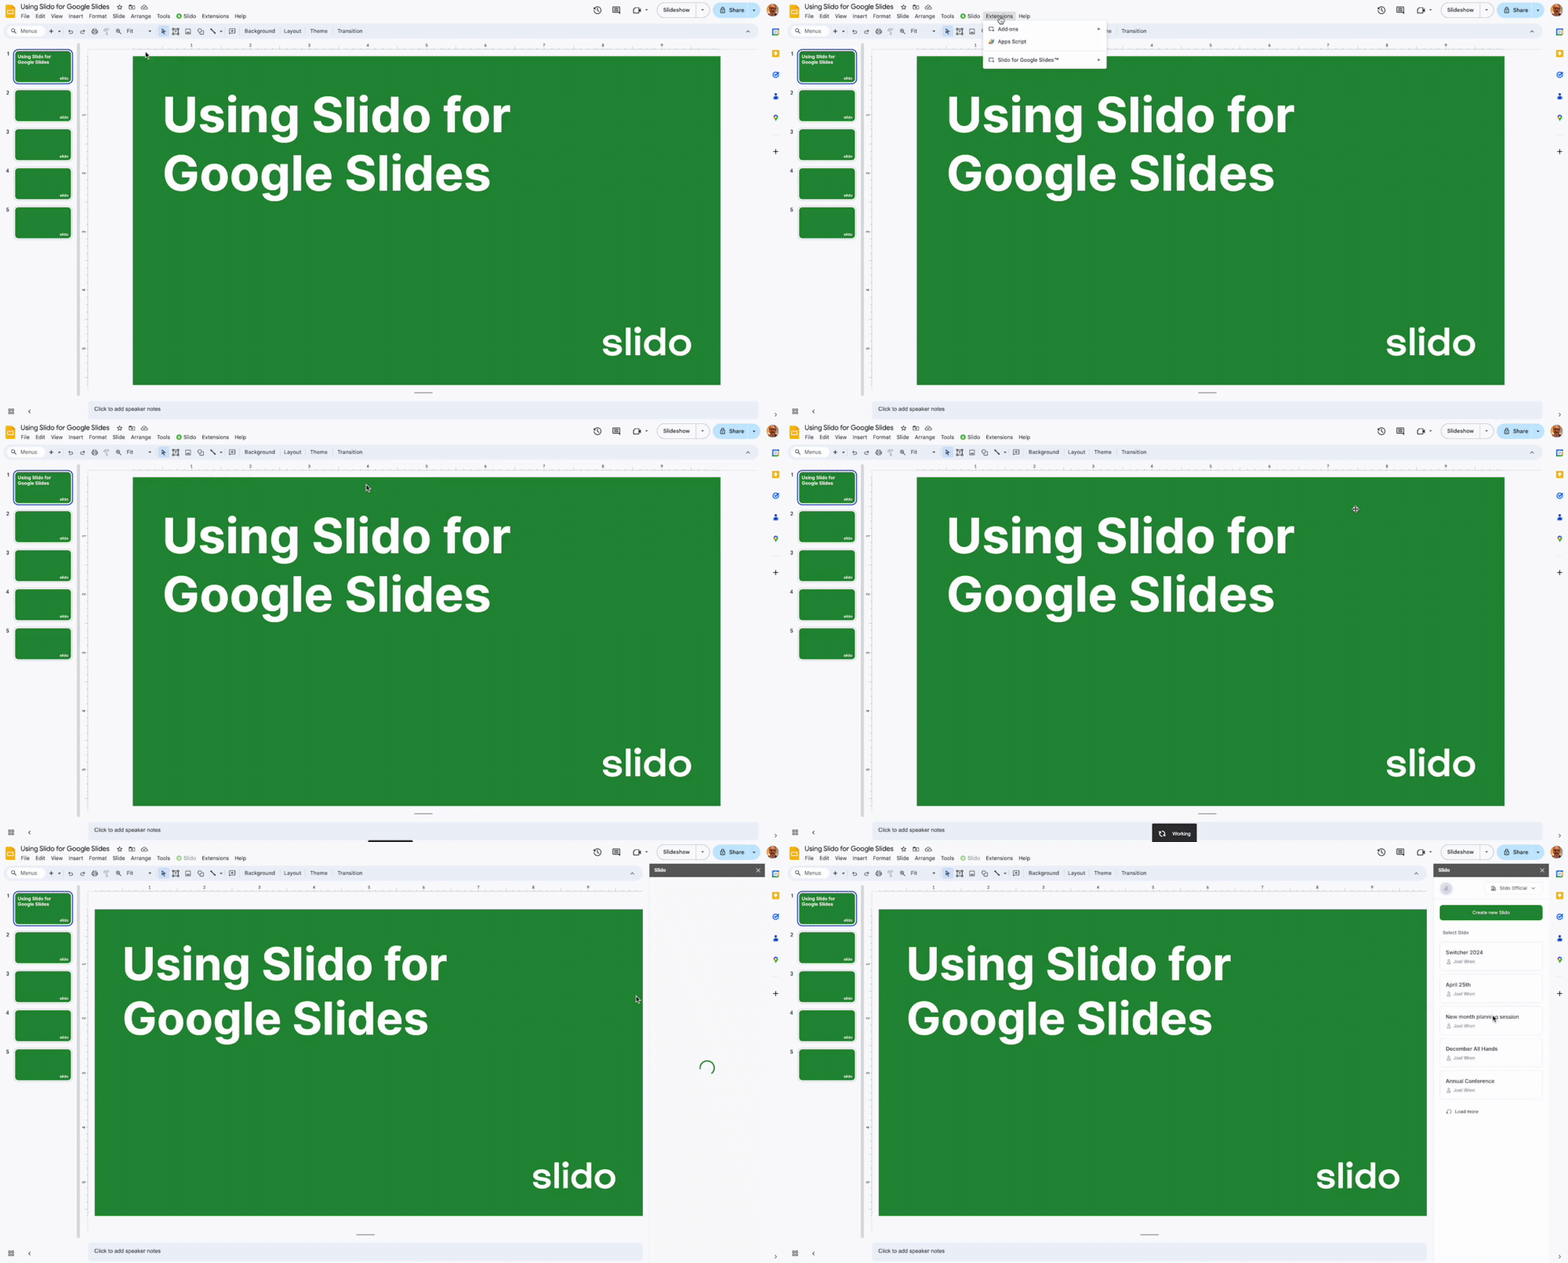
- Install our add-on
- Click Extension and select Slido for Google Slides
- Click Open the sidebar and sign in if necessary
Having trouble with the add-on? Scroll all the way down to find our troubleshooting guide.
Add a slido to your presentation
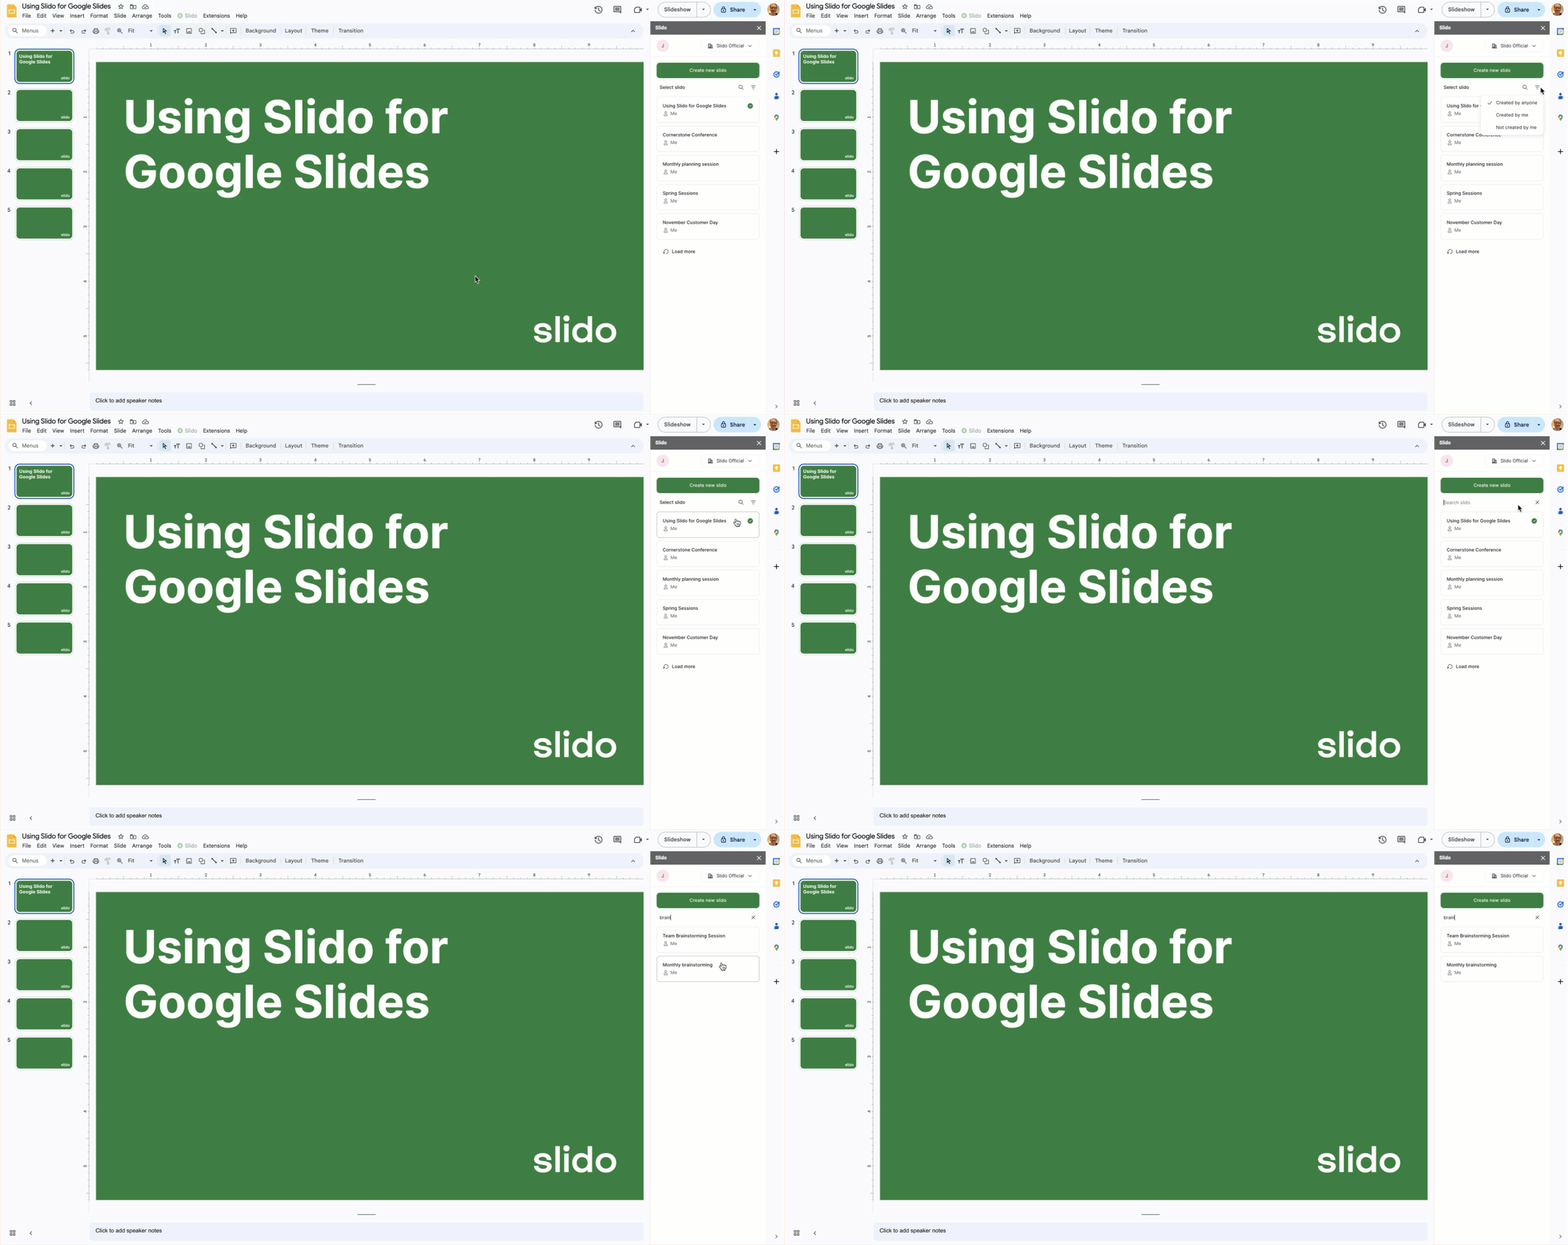
In the sidebar, you’ll be able to select an existing slido to use or create a new one.
Pro tip: Use the filter and search options to find and add any specific slido. This is especially helpful if you’re a license owner, license admin, or anyone else who has access to a lot of slidos.
Add our Slido extension to Chrome
For a seamless presenting experience, add our extension for Google Chrome along with the add-on. The extension is not required. However, it ensures that your animations, transitions, videos, and GIFs all work well when presenting.
Read more about the integration's limitations – some of which can be avoided by installing our Chrome extension.
Add live polls and Q&A to your presentation
Adding polls and displaying results:
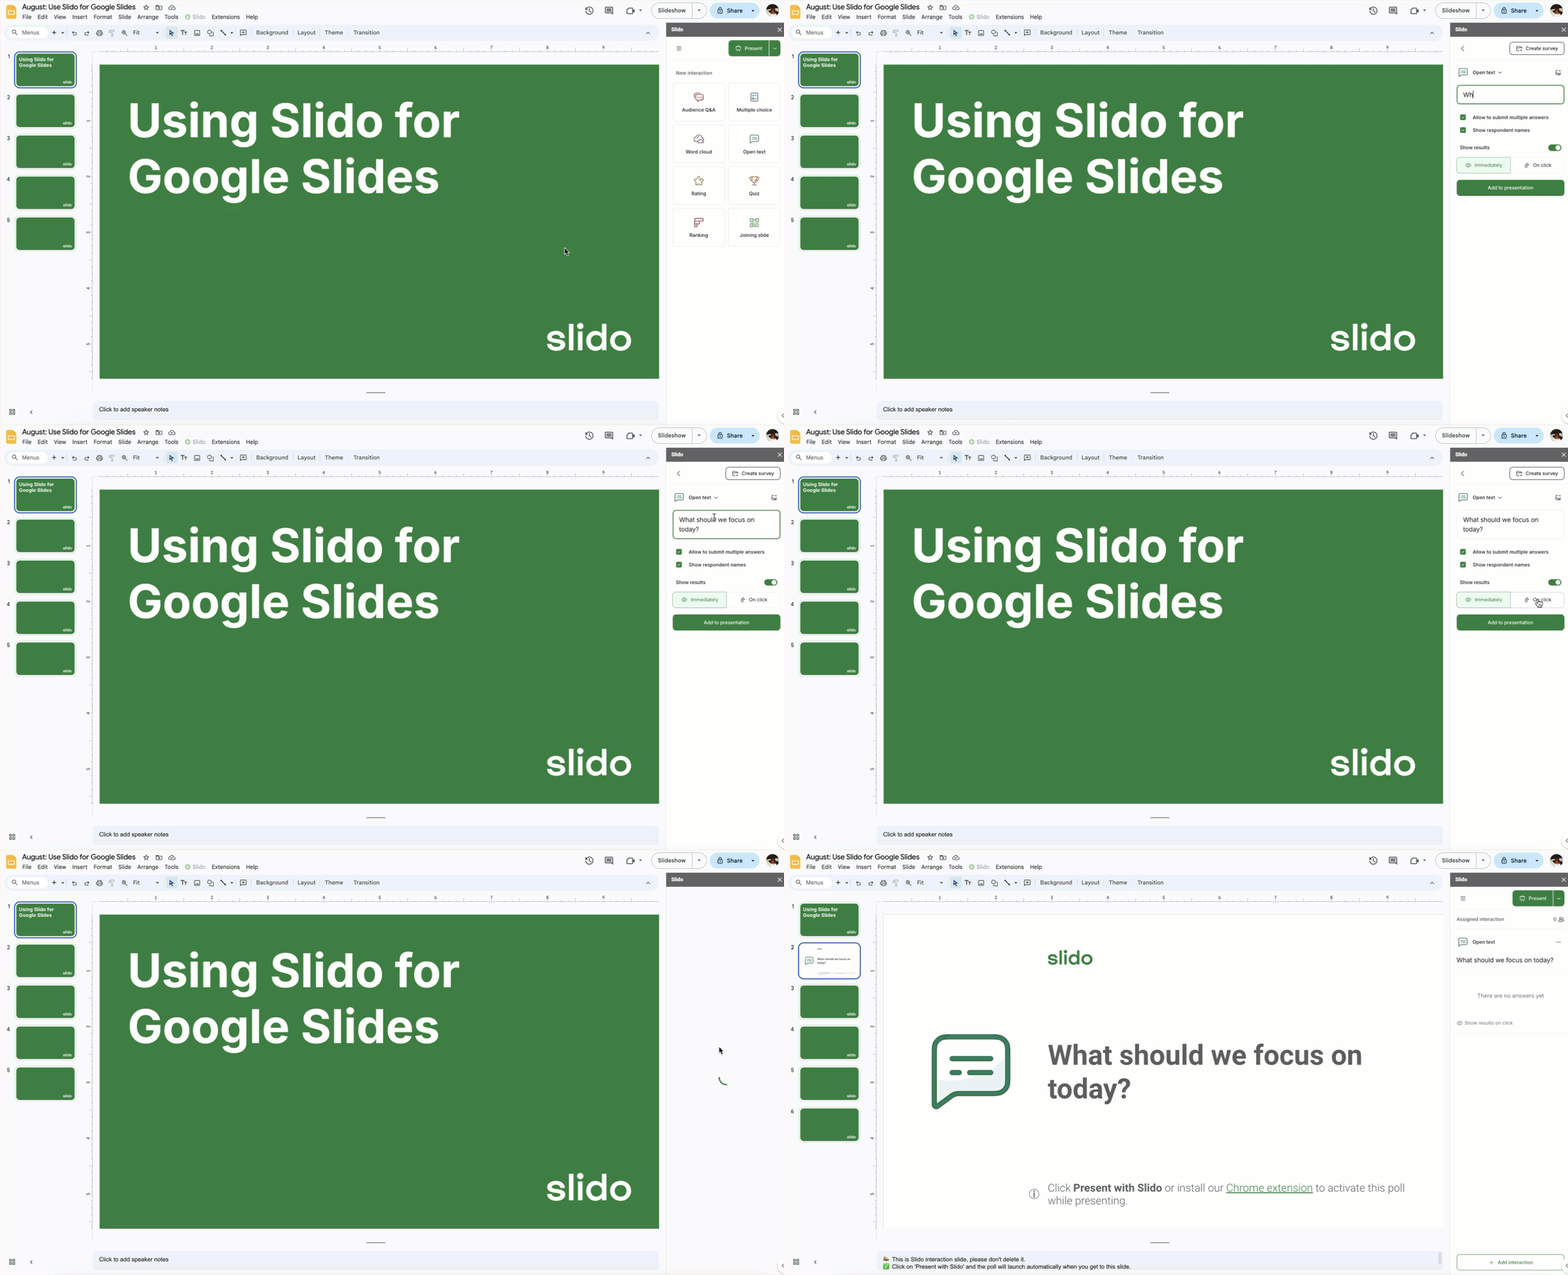
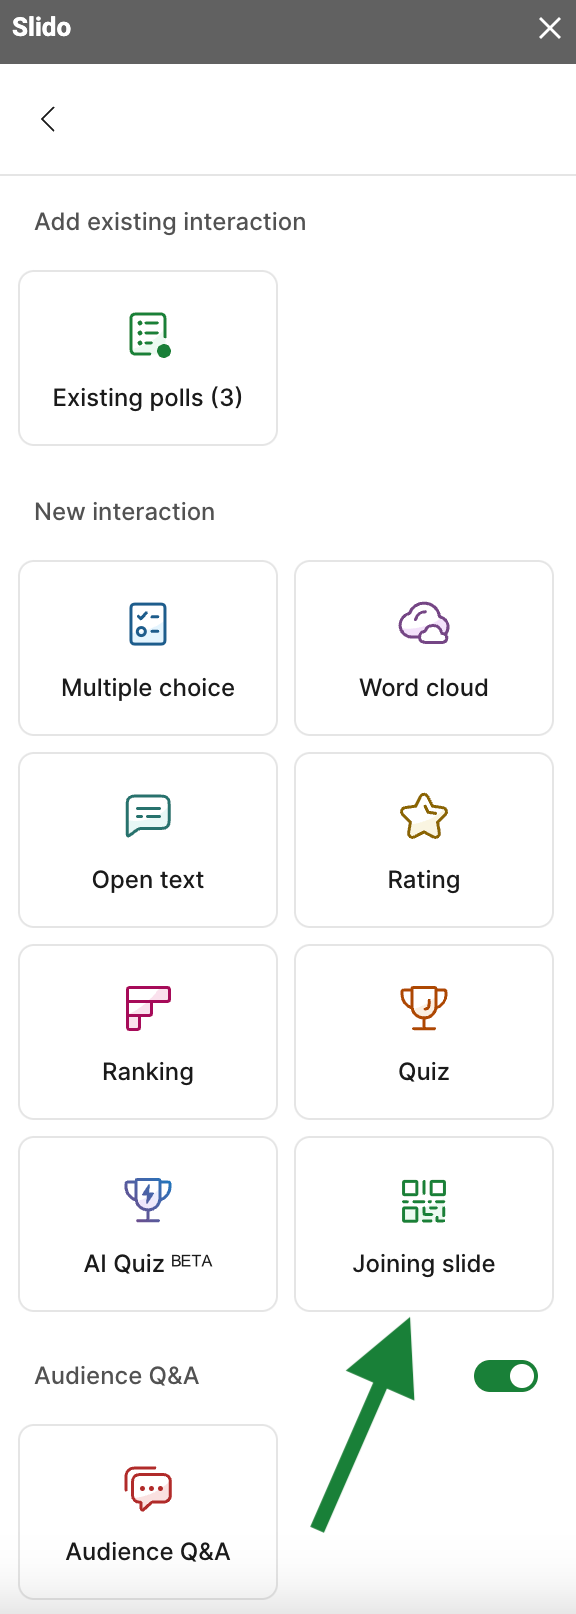
Under New interaction, choose a poll type to add to your Google Slides presentation. When adding or editing a poll, you can choose how to display your poll results. If you don’t want to display the results to your audience, simply toggle off Show results. When it’s toggled on, you have two options for displaying the results:
- Immediately - The poll question and results are displayed in real time when presenting the slide.
- On Click - The poll question is displayed first when presenting the slide. Advancing one more click displays the results.
Add a poll and choose how to display results
Polls are added as individual slides and they activate automatically as you present. This allows your audience to vote in real time.

Slido for Google Slides now offers an AI Quiz BETA feature for Basic users. It functions just like a standard Slido quiz, but is created in just seconds using AI.
Adding Q&A:
Just like polls, adding Q&A creates a new slide. Simply select the Audience Q&A option under New interaction and you’re all set.
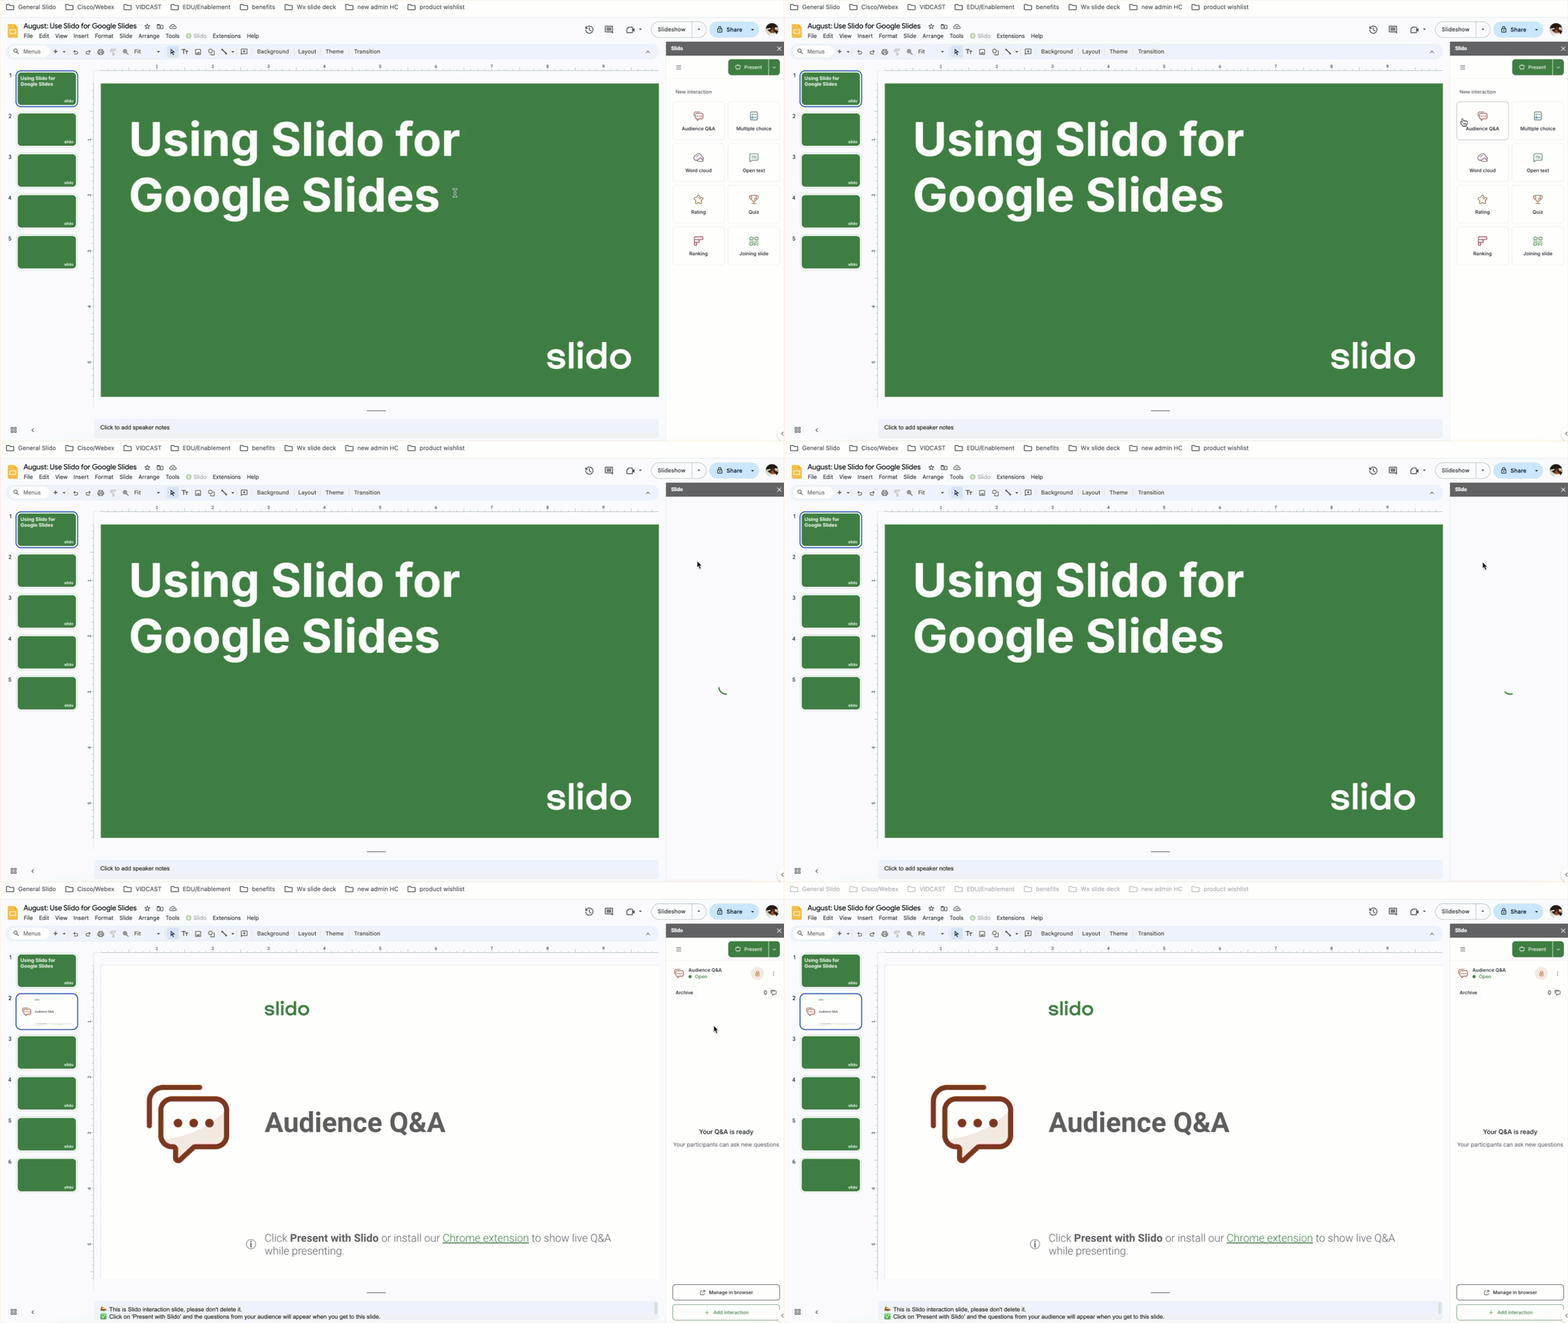
The Audience Q&A is open throughout your presentation, but the Q&A slide displays the questions directly while presenting.
All submitted questions will appear in the sidebar. There you’ll have the following options:
- Delete or archive individual questions: Hover any question and choose either the delete or archive option.
- Close or open the Q&A: Audience Q&A is open by default when you add it to your presentation. But you can always close or reopen it using the lock icon near the top of the sidebar.
- View archived questions: Select the Archive button to view any questions you’ve previously archived.
- Open Q&A in your browser: Select the Manage in browser button to open your Q&A in a new browser window. This is especially helpful if you have a lot of questions coming in from your audience and/or you’re using Q&A moderation.
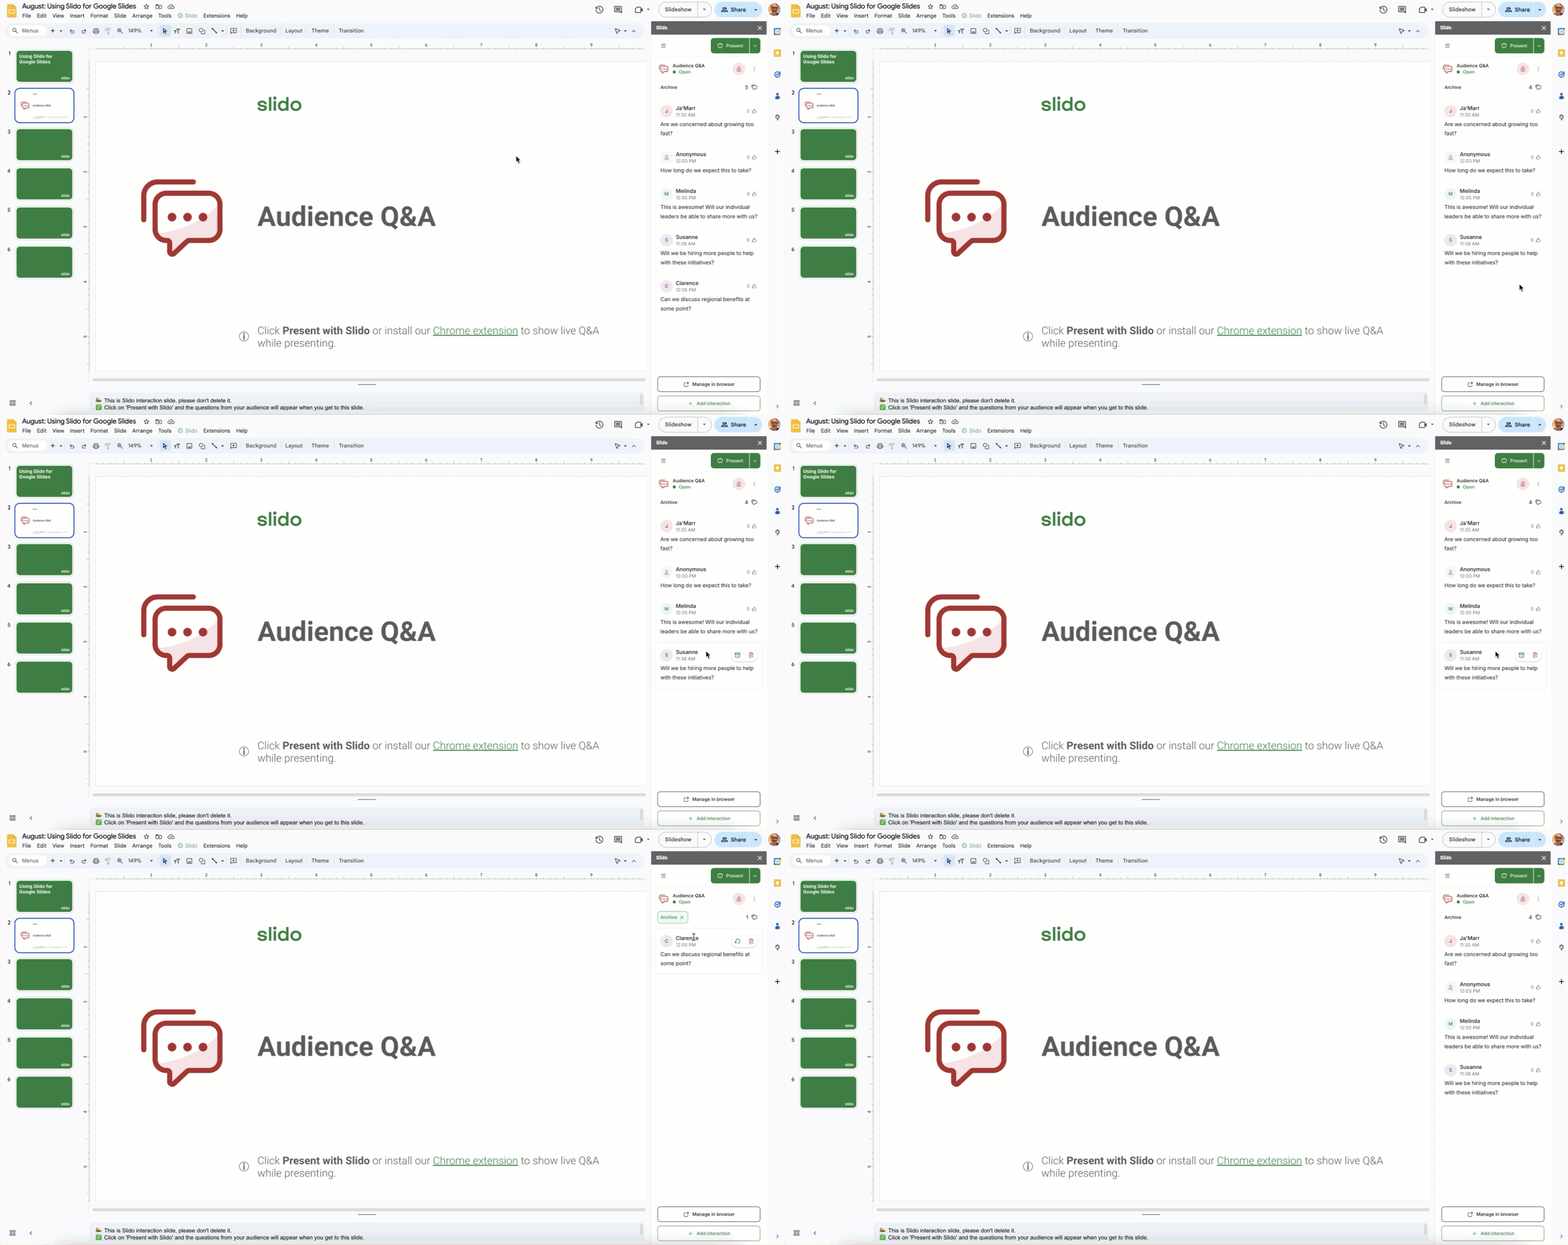
The Manage in browser option opens up your Q&A in Slido Host mode. This is also where you can set up your Q&A and polling in advance if you wish.
Bulk Q&A actions: Select the three-dot menu for Q&A bulk actions. There you can archive all questions, download all questions, or simply remove the Q&A from your slido entirely.

Pro tip: With our Chrome Extension you can display the Q&A anytime you want by simply clicking the Slido button in the control bar.
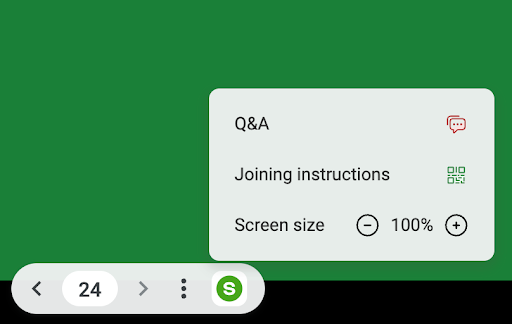
Change your Slido theme
Easily change the theme of Slido slides to match your presentation. You can add your custom colors or upload a background image directly from the sidebar.
- Click on the hamburger menu icon in the top left of the sidebar
- Select Customize
- Choose a theme from our gallery or click Edit to select custom colors or upload a background image
How to present with Slido
To start presenting your slideshow, remember to click the green Present button in the sidebar.
If you're using our Chrome extension, you can use the regular Google Slides Present button.
Tips for presenting:
- Use images to add context to your poll questions. Select the image icon when creating or editing a poll to upload a picture from your desktop.
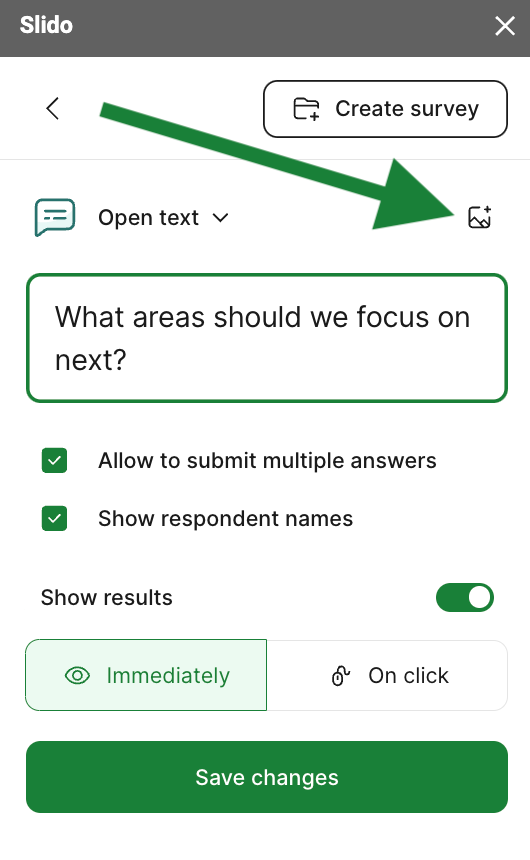
Add an image to your poll
- Use the Zoom in/out option when presenting. This can help display more responses without having to scroll – and you can find it under the Slido menu in the control bar.
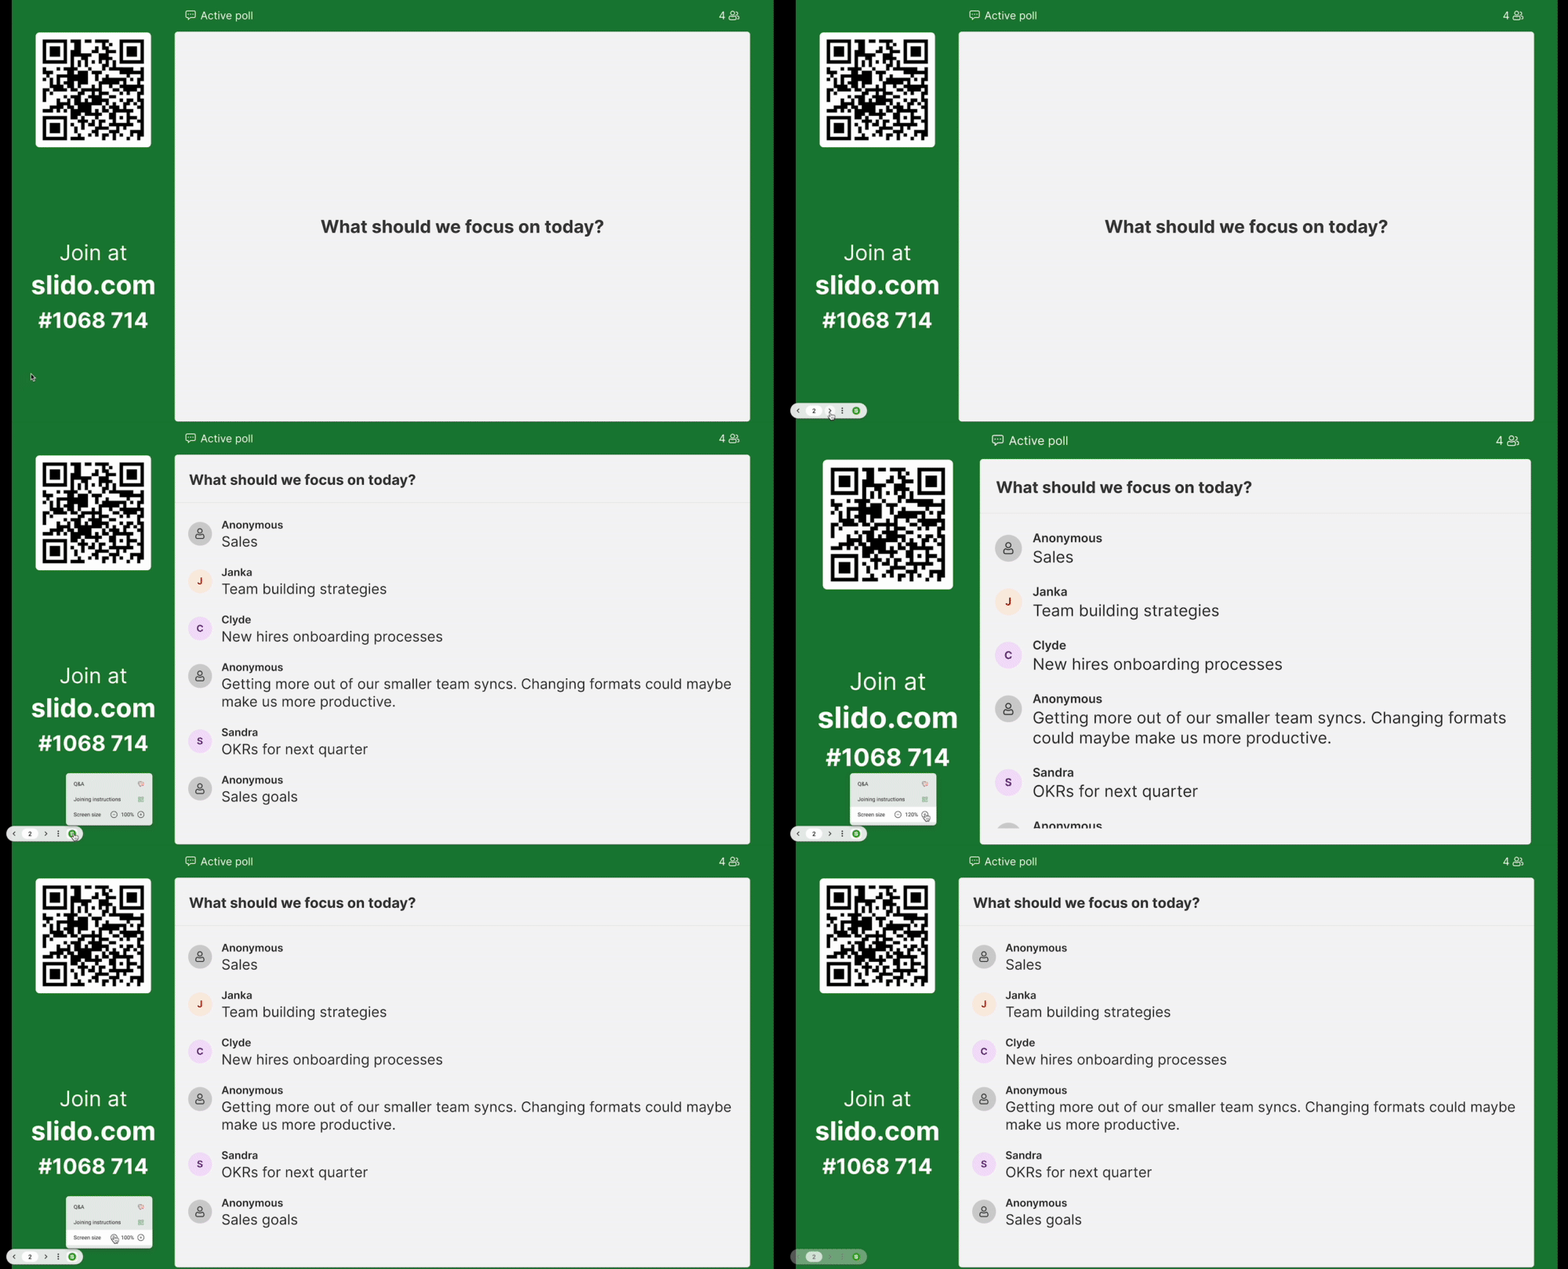
Zoom in/out while presenting
Ask your audience to join
Every Slido slide will display the slido code and QR code on the left side. To join your slido, participants can enter the slido code at slido.com or scan the QR code on their mobile devices. Once they join, they can interact with your polling and Q&A.
You can also pair our Google Slides integration with Webex, Zoom, or Microsoft Teams. This allows your meeting participants to join directly from their meeting window.
Pro tip: Add a Joining slide to your presentation. Joining slides display the joining instructions for Slido and that’s it. It’s great for introducing your audience to Slido and inviting them to participate.
Settings
Access your slido’s settings and more using the Menu in the top left corner of the sidebar. See the menu options below and learn how they can each help get the most out of your presentation with Slido.
- Share with participants: Here you can copy your slido’s direct joining link or copy/download its QR code.
- Collaborate: View and manage co-host access to your slido.
- Change background: Change the theme for your Slido slides to match your presentation.
- Manage slido in browser: View your full settings at slido.com. Here you can adjust more complex settings such as privacy or branding.
- View analytics: This opens up your Analytics at slido.com, where you can view and download your data.
- Reset slido: Use this option to reuse the same slido within the presentation. Poll results will be deleted and Q&A questions will be archived.
- Duplicate slido: Use this option when you’re using the same presentation with a new audience. This will create a new slido with the same polls attached to your slide deck. Your original polls and audience questions will still be available to you at slido.com under the original slido.
- Use different slido: Select a different slido to use with your presentation.
It is currently not possible to unlink a slido from a Google Slides presentation, but you can reuse the slido or add a new one to your presentation.
Troubleshooting
Here is a list of the most common issues and how to fix them:
- The sidebar says “Drive refuses to connect”.
Solution: Log out of Chrome and log in again. Alternatively, you can try to use the same Google account in both Google Drive and Chrome.
- I can’t see the add-on or I only see Help in the menu.
Solution: Refresh the Google Slides presentation and make sure you’ve installed the add-on to the Google account that you use for presentations.
- I opened my .pptx file in Google Slides, but I can’t see the add-on
Solution: In Google Slides, create a “blank” presentation. Then, click File > Import Slides and Upload the preferred PowerPoint presentation from your computer. Then, select all slides you want to import to Google Slides.
- I can’t log in to the add-on. It just keeps loading.
Solution: Create a new Google Slides presentation or Make a copy of the existing one and log in there.
- The sidebar says the presentation is linked to another account and I can’t log in.
Solution: Make a copy of the Google Slides presentation. Either someone else added Slido to the presentation or you did so under a different account.
- I can’t install the Chrome extension to my account.
Solution: Reach out to your IT administrator to help you with the installation and share with them this guide.
Curious about more?
